WebGPU Occlusion Culling in VTK

Following the previous blog post on compute shaders in VTK using WebGPU, we now present the introduction of an occlusion culling algorithm, targeted at further improving the rendering performance of scenes containing large numbers of cells or actors.
Why the occlusion culling?
The frustum culling algorithm presented in our previous blog post culls props that are outside of the field of view of the camera. There is yet another culling optimization that aims at improving performance even further than what frustum culling alone can achieve.
This additional culling algorithm falls into the category of “occlusion culling” algorithms. Because the algorithm is very parallel, it has been implemented in VTK using compute shaders and the WebGPU Compute API.
Two-Pass Hierarchical Z-Buffer Occlusion Culling
Depth buffer
The occlusion culling algorithm aims at excluding objects that are behind other objects from the rendering process. In practice, this is done by comparing the depth of the object that we want to render against the depth buffer of already rendered objects. If the depth of our object is greater that the depth present in the depth buffer, then that means that our object is behind the current geometry and must be culled.

Where do we get that depth buffer from? The point of the occlusion culling algorithm is to cull objects before the rendering pass. The depth buffer is not constructed until the rendering pass, so we do not have access to it. The solution to this problem is to use a two-pass approach where the objects that were visible in the last frame are rendered again in a prepass for the current frame. The depth buffer resulting from these objects is then a good approximation of the objects that are going to be visible in the current frame (assuming no excessive camera movements). We can now compare the objects that we want to render for our current frame with that depth buffer.

Depth comparison
One question that remains is how to compare the depth of our object with the depth from the depth buffer?
The process is actually pretty straightforward:
- Compute the bounding box of the object
- Project that bounding onto the viewport (using the camera view-projection matrix): this gives us a screen-space bounding rectangle of the object
- For each texel of the depth buffer encompassed by that bounding rectangle, compare the depth of the depth buffer at that texel with the depth of the bounding rectangle (we’re using the front-most point of the object to approximate the depth of its whole bounding rectangle)
Now, comparing each texel covered by the bounding rectangle of the object is going to be too expensive. Instead, we’re going to use the hierarchical z-buffer to make that comparison with only 4 texel fetches. The goal is to compute a mipmap chain of our depth buffer (constructed from rendering the objects that were visible last frame). We will then select the mipmap of the hierarchical z-buffer in which the bounding rectangle of our object is a 2×2 square. Comparing the depth of our object against that mipmap of the depth buffer will then require only 2×2 = 4 fetches instead of the many that would have been necessary without the mipmap chain.

Usage in VTK
Using the occlusion culler in VTK is fairly straightforward. The compute occlusion culler must be created and its render window must be set. It can then be added to the list of cullers of the renderer.
vtkNew<vtkWebGPUComputeOcclusionCuller> webgpuOcclusionCuller;
webgpuOcclusionCuller->SetRenderWindow(vtkWebGPURenderWindow::SafeDownCast(renWin));

renderer->GetCullers()->AddItem(webgpuOcclusionCuller);
Note that you may also want to remove the default culler from the renderer before adding the occlusion culler:
renderer->GetCullers()->RemoveAllItems();One detail needs to be taken care of however: the render window must have been “Initialized” before it is set on the occlusion culler:
vtkNew<vtkRenderWindow> renWin;

// Initialize() call necessary when a WebGPU compute class is going to use the render window.
// Here, the OcclusionCuller internally uses the resources of the render window so Initialize() must be called

renWin->Initialize();
And that’s it. The occlusion culler will execute at each frame, culling actors that are occluded by other actors.
Results
The following charts are the results of benchmarking the occlusion culling algorithm in the Amazon Lumberyard Bistro 3D environment of ~1300 actors where the camera followed a predetermined path. More or less actors occlude each other depending on the camera’s point of view, allowing the evaluation of the occlusion algorithm in a real-world scenario.
To be able to benchmark on a varying number of triangles but with the same occlusion conditions, the same 3D environment was used but with actors more or less subdivided (with a vtkLoopSubdivisionFilter).
The X axis of the following charts represents the number of the frame in the predetermined animation. The right Y axis is the frame time. The left Y axis is the number of triangles rendered at that frame.
No culling vs. occlusion culling
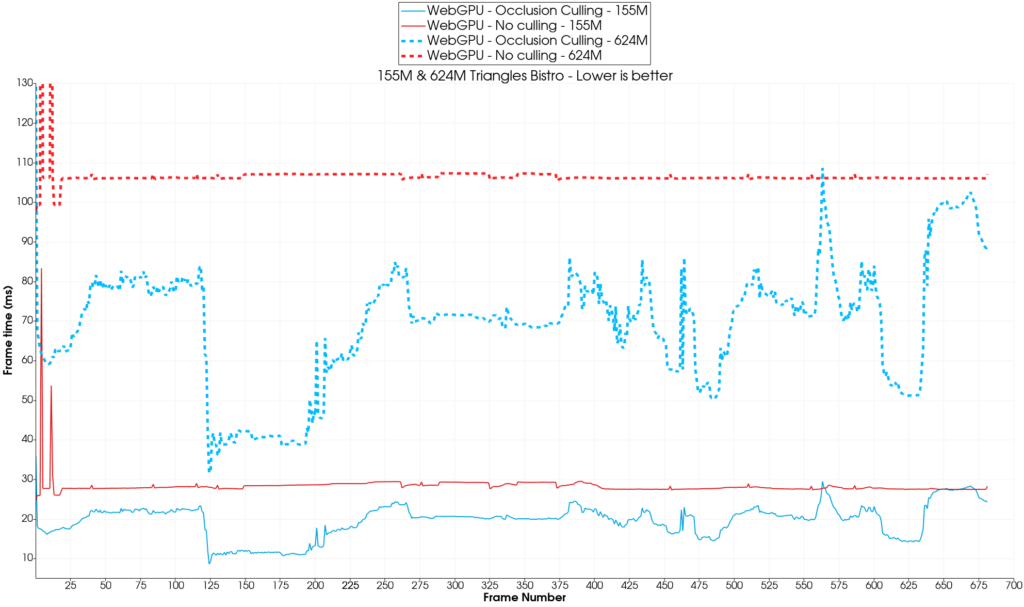
On the 155M and 624M triangles scene, the occlusion culling algorithm alone comes out on top with an average speedup of 1.5x and 1.6x respectively.
WebGPU vs. OpenGL
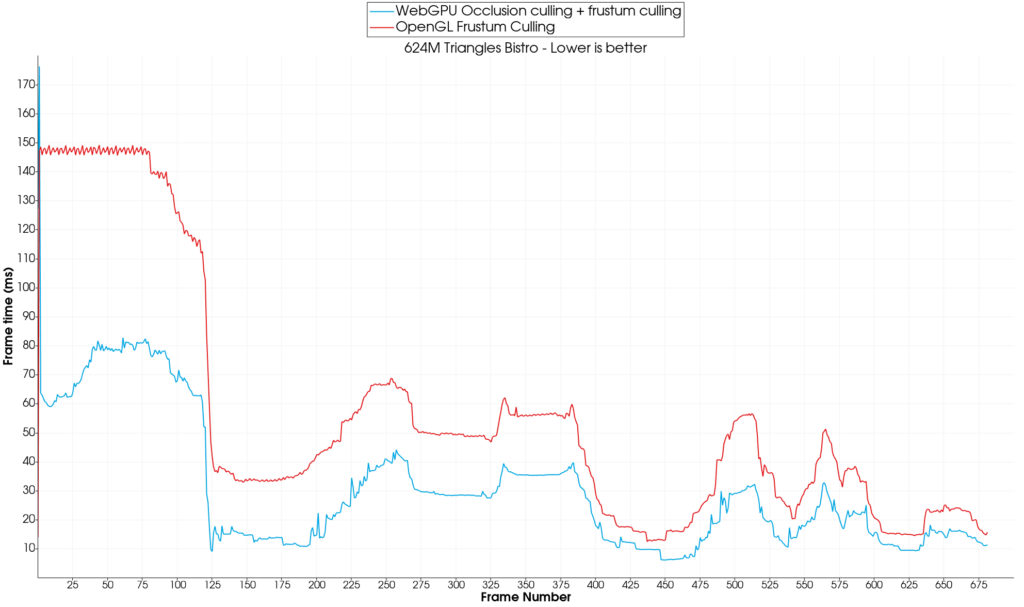
Frustum culling compounds very well with occlusion culling and the speedup obtained is even more pronounced, reaching 5x-6x on average compared to no culling at all (WebGPU vs. WebGPU). Against OpenGL, WebGPU also does well on the 624M triangles scene with an average speedup of 2x.
WebGPU implementation limitations
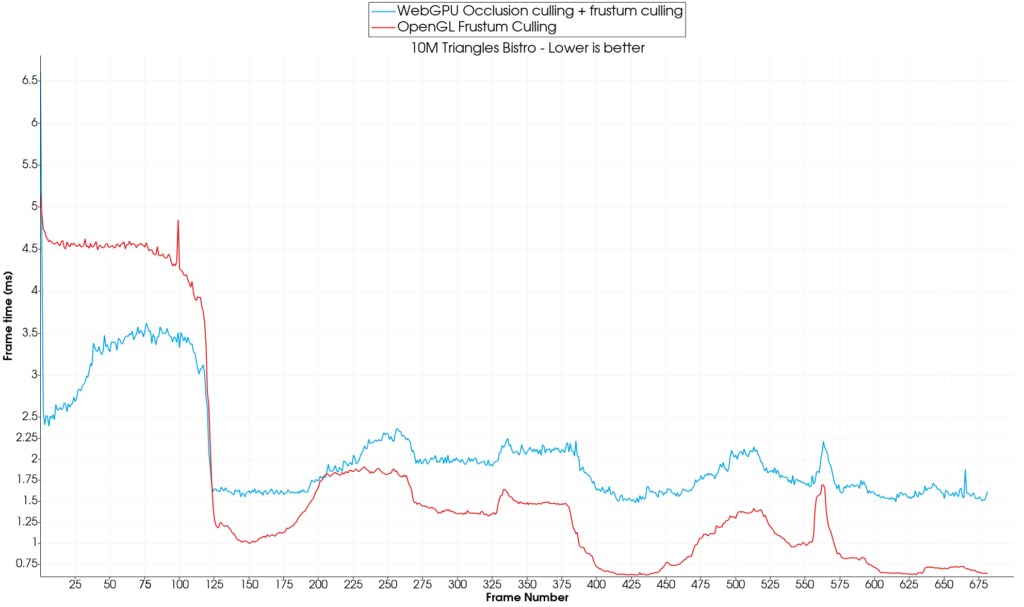
The GPU implementations of the frustum & occlusion culling algorithms however have a cost and for a smaller amount of triangles (10M here), the OpenGL + CPU Frustum culling implementation outperforms the WebGPU Occlusion + Frustum culling setup. This can be explained by the fact that, in the WebGPU implementation, communicating with the GPU back and forth (to send the objects for culling and get the results back) has a cost. On top of that, the occlusion culling algorithm needs to compute the mipmaps of the hierarchical depth buffer at each frame. The benchmarks have been run at a 1280×720 resolution. Although this is not an unreasonable resolution, computing the hierarchical z buffer still requires a few compute shader passes with synchronization in-between each pass. With frames being less than 2 milliseconds, it is no surprise that all this work starts to become the bottleneck. The OpenGL CPU frustum culling implementation doesn’t have any “additional work” drawbacks: the objects are culled on the CPU and the objects that passed the culling test can directly be sent to the GPU for drawing. No superfluous work is needed.
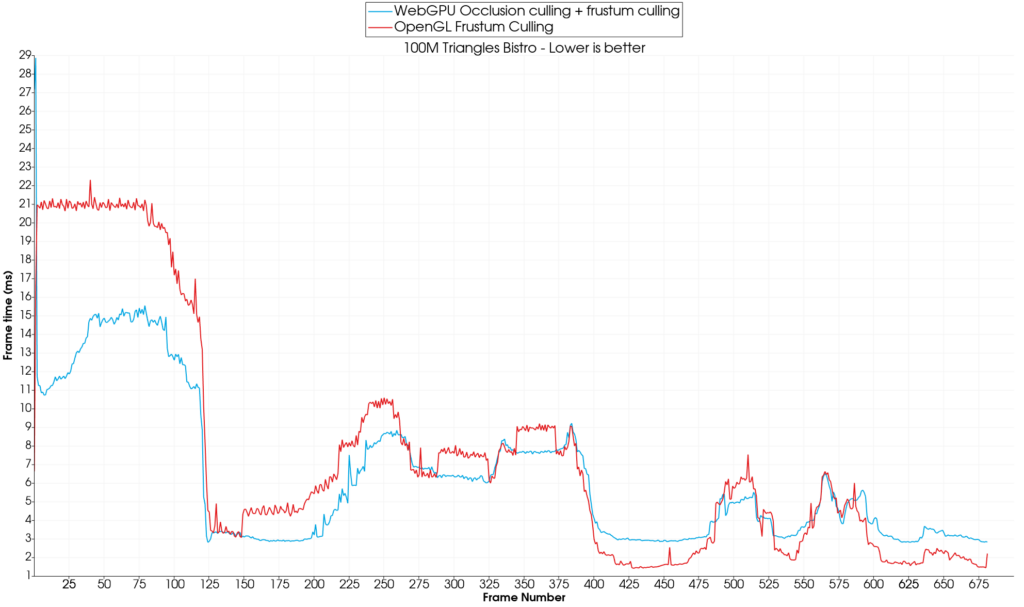
On our tested scene, the WebGPU implementation starts to show some benefits after around 100M triangles (10% faster on average for 100M triangles):
Here is a summary table of the results obtained from our testings:
| Triangles count / Min & Max & Avg frame time [avg speedup vs. OpenGL] | OpenGL + CPU Frustum Culling (ms) | WebGPU No culling (ms) | WebGPU + Occlusion Culling (ms) | WebGPU + Occlusion Culling + GPU Frustum Culling (ms) |
| Bistro 10M Triangles | 0.6 / 1.7 / 5.2 [1x] | 1.9 / 2.3 / 5.6 [0.74x] | 1.9 / 3.2 / 5.0 [0.5x] | 1.5 / 2.1 / 6.6 [0.8x] |
| Bistro 39M Triangles | 0.7 / 2.6 / 7.3 [1x] | 6.0 / 7.6 / 21.6 [0.34x] | 3.1 / 6.6 / 11.6 [0.39x] | 1.6 / 3.4 / 13.8 [0.76x] |
| Bistro 74M Triangles | 1.7 / 5.4 / 17.0 [1x] | 9.1 / 12.7 / 38.0 [0.43x] | 5.9 / 10.7 / 19.9 [0.5x] | 3.2 / 5.3 / 22.6 [1x] |
| Bistro 155M Triangles | 2.7 / 13.0 / 34.5 [1x] | 24.7 / 28.2 / 83.3 [0.46x] | 8.6 / 19.6 / 36.0 [0.66x] | 2.2 / 9.0 / 46.4 [1.44x] |
| Bistro 624M Triangles | 12.4 / 55.9 / 149.1 [1x] | 97.9 / 106.7 / 324.2 [0.52x] | 31.6 / 69.4 / 131.3 [0.8x] | 6.1 / 30.5 / 176.3 [1.83x] |
OpenGL is only outperformed by the occlusion culling + frustum culling WebGPU algorithm combination for more than 100M triangles.
Conclusion
The occlusion culling algorithm shows most of its benefits in complex scenes where some actors are occluded by others. Scenes that don’t present occlusion between actors will most probably see a degradation in performance due to algorithms overhead not being hidden by the benefits.
The gap in performance between frustum-culling only and occlusion culling would also widen in favor of the occlusion culling as the shading of the cells / points gets more and more involved. This benefit should be kept in mind.
Note that although all this work has been implemented using the Dawn C++ desktop implementation of WebGPU, this can all be ported for use on the web by compiling to Web Assembly.
This work is an internal effort of Kitware Europe.