LidarView temporal camera animations
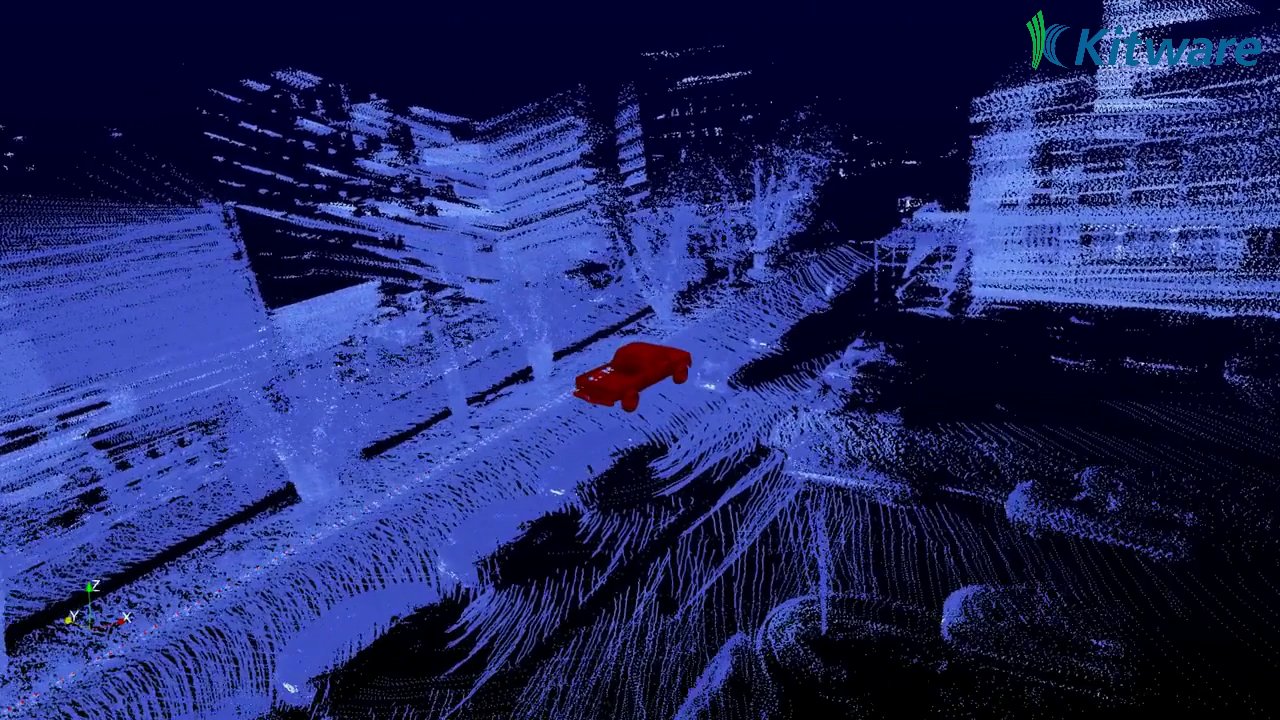
In this post, we will see how to use tools included in LidarView to programmatically generate visualizations of a temporal dataset (a dataset evolving with time, such as a Lidar recording) with a moving camera using ParaView animations and screenshots.
Animations in LidarView
We can distinguish 2 types of animations in LidarView:
- temporal animations are animations that depend on the data flow. They increment the pipeline time at each step and require providing a trajectory input which is used to move the data reference (e.g. the car reference for a Lidar placed on a car) at each step.
- non-temporal animations are simpler animations, moving the camera but not updating the pipeline time. The camera moves in a “frozen” version of the data. This kind of animation also works on both temporal and non-temporal data.
In this tutorial, we’ll see how to generate temporal animations like the following:
[vimeo 424696926 w=640 h=360]Overview of the different kinds of temporal animations
Animations with a movement relative to the scene
Fixed position view
The scene is viewed from a constant point in the scene reference, fixed compared to the background.
Absolute orbit
The scene is viewed following an orbit around a point of the scene reference.
Animations with a movement relative to the trajectory
First person view
The scene is viewed from the current point in the trajectory.
Third person view
The scene is viewed from a constant point relative to the vehicle (ie. to the current trajectory point).
Relative orbit
The scene is viewed following an orbit centered on the vehicle (ie. around the current trajectory point).
How to create such animations
Camera animations in LidarView are generated with a PythonAnimationCue object, which expects a script to define what the animation is doing when it starts, at each step and when it ends.
This script must have the following structure:
import paraview.simple as smp

def start_cue(self):
    """Function called at the beginning of the animation
    """
    ...

def tick(self):
    """Function called at each time step of the animation
    """
    ...

def end_cue(self):
    """Function called at the end of the animation
    """
    ...
The smp.PythonAnimationCue() object requires this python script to be manually copy/pasted to the LidarView interface or provided as its animation.Script property (as a string).
LidarView now provides helper modules to create such scripts:
- temporal_animation_cue_helpers.py and
- camera_path.py
Those scripts require to have scipy installed on the python used by LidarView (pip install scipy on Linux or OS X).
How to define an animation cue script with temporal_animation_cue_helpers
An animation cue script is meant to be provided to a PythonAnimationCue. The usage of PythonAnimationCue is explained further down in this tutorial.
temporal_animation_cue_helpers provides some helpers functions in order to generate start_cue / tick / end_cue for temporal data with a trajectory using minimal code:
start_cue_generic_setuptickend_cue
Some of the module parameters can/must be overridden to correspond to your actual setup:
trajectory_name: the name of the element of the pipeline that serves for trajectory (it must containTimeandOrientation(AxisAngle)for each point)cp.R_cam_to_lidar: the rotation between the Lidar reference and the camera reference, see below for more details on how to set it (it is actually a parameter of camera_path)frames_output_dir: directory where you save the output screenshots (use empty string to disable saving)cad_model_name(optional): the name of the element of the pipeline that serves for the 3D model to place at the current trajectory point for each frame.
start_cue_generic_setup
This method runs generic setup steps at cue start. It is intended to be run inside a start_cue before the camera definition step.
The different steps it runs are:
- getting the trajectory
- getting the frames orientations from the trajectory
- (optional) getting a 3D model (for example a car model to add to the frame display)
- setting the start timestep
The only setup left to do is the camera path, which can be composed of:
CameraPathobjects (FirstPersonVew,ThirdPersonView, …). See below for hints on how to set their parameters.- Transitions between those objects following this model:
current_camera.set_transition(former_camera, interpolation_type)
# interpolation type can be: linear, square, s-shape
Example:
import temporal_animation_cue_helpers as tach
def start_cue(self):
    tach.start_cue_generic_setup(self)
    c1 = ThirdPersonView(...)
    c2 = FirstPersonView(...)
    c2.set_transition(c1, 's-shape')
Please note that each camera path takes beginning and end timesteps with an offset of self.i, this enables the animation to start at the trajectory point corresponding to the current View timestep (see examples further down).
tick
This method runs the following steps at each timestep:
- get the current orientation and position from the trajectory
- move the camera according to this pose and the CameraPath defined for the current timestep
- move the 3D model
- save the current frame using ParaView’s
saveScreenshotmethod.
As a PythonAnimationCue script expects a tick function with only a self argument, this function can be either directly used with its default keyword arguments or wrapped in another function that provides its keyword arguments.
Example:
import temporal_animation_cue_helpers as tach
def tick(self):
    tach.tick(self, filenameFormat="…", imageResolution=(1920, 1080))
end_cue
This method only prints that the animation is finished. It can be used directly with an import.
Example:
from temporal_animation_cue_helpers import end_cueExample
Here is an example of a full PythonAnimationCue script.
See example_temporal_animation.py (https://gitlab.kitware.com/LidarView/lidarview-core/-/blob/master/Utilities/Animation/example_temporal_animation.py) for an example in context.
import temporal_animation_cue_helpers as tach
import camera_path as cp

tach.trajectory_name = "your-trajectory"
tach.cad_model_name = "your-model"
cp.R_cam_to_lidar = Rotation.from_euler("XYZ", [0, 90, -90], degrees=True)
tach.frames_output_dir = "/your/ouptut/dir"

def start_cue(self):
    tach.start_cue_generic_setup(self)
    c1 = cp.FirstPersonView(...)
    c2 = cp.FixedPositionView(...)
    c2.set_transition(c1, 5, "s-shape")
    self.cameras = [c1, c2]

# tick and end_cue methods don't depend on the camera path so they can
# be directly imported from the temporal_animation_cue_helpers module
# if they are used with their default keyword parameters

from temporal_animation_cue_helpers import tick, end_cue
How to set the parameters (position, up_vector, focal_point, …) for the different camera paths
AbsoluteOrbitandFixedPositionVieware camera paths that are not relative to the trajectory, hence they expect absolute parameters (with coordinates in the fix reference of the view).ThirdPersonView,FirstPersonViewandRelativeOrbitexpect coordinates that are relative to the trajectory, so they expect coordinates in the camera reference (ie. the reference of the current lidar frame, rotated byR_cam_to_lidar).
How to set R_cam_to_lidar
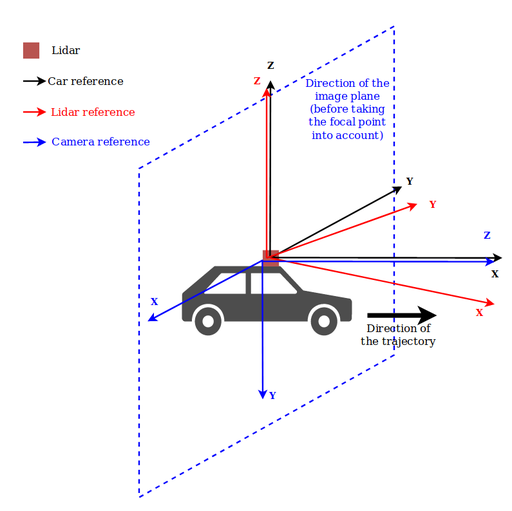
R_cam_to_lidar is the rotation between the camera frame and the lidar frame. The camera has to be set with X, Y forming the image plane, and Z pointing in the field of view of the image.
Example:
In the following case (from dataset-la-doua), the Z axis of the lidar is vertical, but X doesn’t point to the front of the car, R_car_to_lidar should be set to something like:
cp.R_cam_to_lidar = Rotation.from_euler('ZYZ', [17, 90.0, -90.0], degrees=True)Which is composed of:
- a rotation of 17 deg around Z to compensate for the Lidar/trajectory yaw angle offset
- a rotation of [0, 90.0, -90.0] to pass from Z in the front (camera reference) to X in the front (Lidar reference)
How to set the camera path parameters
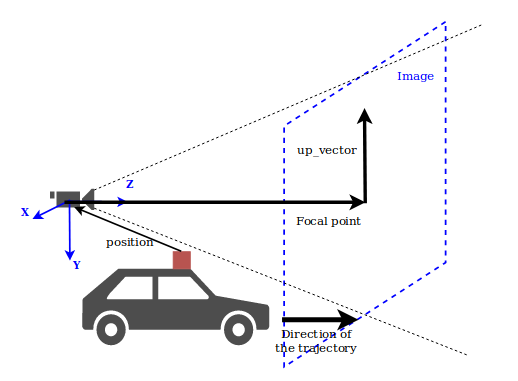
position: position of the camera, either- in the frame reference for absolute camera paths
- in the camera reference, with the Lidar position as origin for relative camera paths
focal_point: focal point of the camera in the camera reference (where the camera is pointing to)up_vector: direction of the top of the image.
Specifics to orbits:
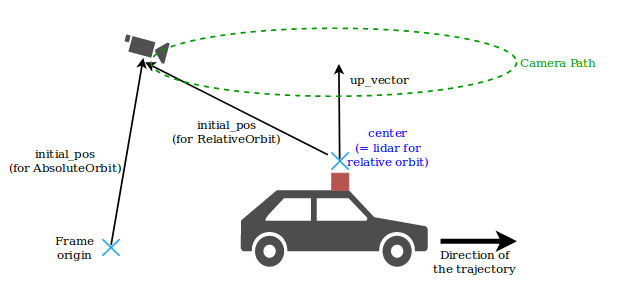
initial_pos: initial position of the camera (similar toposition)up_vector: rotation axiscenter: center of rotationccw: 1 or -1, decides the rotation direction (counter-clock-wise by default)
Specific to FixedPositionView:
positionis by default to None, in which case it takes the current positionfocal_pointis by default to None, in which case it uses the Lidar position
Tips
How to generate a pseudo first person view from the top of a car model
c1 = cp.ThirdPersonView(self.i, self.i+40, focal_point=[0, 0, 20], position=[0, -1.7, -3.5])This enables being slightly behind and on top of the car and see the front of it in the view.
How to add, scale and center a 3D car model
(The values for this example are valid for dataset-la-doua)
Steps:
- add a cad model reader
- add a transform to make the model look forward in the Lidar reference
- add a second transform to let the camera_animation_cue move the car with the trajectory.
Example:
carModelPath = '/path/to/your/3D/models/small-red_pickup.obj'
carModelRotation = [90, 90 + 17, 0]
# [90, 90, 0] to compensate the model orientation
# + [0, 17, 0] to compensate the lidar orientation to the front of the car
carModelScale = [0.85] * 3
carModelTranslation = [0, 0, -1.5] # this lets the car lie on the floor

if not carModelPath:
    carModel = None
else:
    carModelSource = WavefrontOBJReader(FileName=carModelPath)

# Scale and center the model
carModelTmp = smp.Transform(Input=carModelSource)
carModelTmp.Transform.Scale = carModelScale carModelTmp.Transform.Translate = carModelTranslation carModelTmp.Transform.Rotate = carModelRotation

# Add a transform to enable the script to move the car model
carModel = smp.Transform(Input=carModelTmp)
How to apply those animations to a pipeline in LidarView
- Define a LidarView processing pipeline
- Make sure the trajectory the View have a similar time base (which can be different of the pointcloud’s time base)
- Select what you want to show in the animation
- Setup the animation
- Play the animation
Using a python script
Define a LidarView processing pipeline
See example_temporal_animation.py (https://gitlab.kitware.com/LidarView/lidarview-core/-/blob/master/Utilities/Animation/example_temporal_animation.py) for an example.
Make sure the trajectory and the data have a similar time base
To do so, you might need to update the trajectory with a timeshift.
Example:
# Correct trajectory with lidar timesteps
# (which are the same as view timesteps)
# to have a common time base
correctedTraj = smp.PythonCalculator(
    Input=trajectoryReader,
    Expression='Time + {}'.format(-timeshift),
    ArrayName='Time')
Select what you want to show in the animation
Example:
# show data in view
dataDisplay = smp.Show(threshold1, renderView1)
trajectoryDisplay = smp.Show(correctedTraj, renderView1)
categoryLut = cmt.colormap_from_categories_config(categoriesConfigPath)
smp.ColorBy(dataDisplay, ('POINTS', 'category'))
Set up the animation
# Create an animation cue with temporal_animation_cue_helpers
anim_cue = smp.PythonAnimationCue()
anim_cue.Script = """
import temporal_animation_cue_helpers as tach
import camera_path as cp
from scipy.spatial.transform import Rotation

# variables setup
tach.trajectory_name = "trajectory"
tach.cad_model_name = "{0}"
tach.frames_output_dir = "{1}"
cp.R_cam_to_lidar = Rotation.from_euler('ZYZ', [17, 90.0, -90.0], degrees=True)

# temporal cue creation
from temporal_animation_cue_helpers import tick, end_cue

def start_cue(self):
    tach.start_cue_generic_setup(self)
    c1 = cp.FirstPersonView(self.i, self.i+40, focal_point=[0, 0, 1])
    c2 = cp.FixedPositionView(self.i+40, self.i+100)
    c2.set_transition(c1, 5, "s-shape") # transition from c1
    c3 = cp.AbsoluteOrbit(self.i+100, self.i+200,
        center= [99.65169060331509, 35.559305816556, 37.233268868598536],
        up_vector= [0, 0, 1.0],
        initial_pos = [85.65169060331509, 35.559305816556, 37.233268868598536],
        focal_point= [99.65169060331509, 35.559305816556, 7.233268868598536])
    c3.set_transition(c2, 20, "s-shape")
    c4 = cp.ThirdPersonView(self.i+200, self.i+280)
    c4.set_transition(c3, 20, "s-shape")
    c5 = cp.RelativeOrbit(self.i+280, self.i+350,
        up_vector=[0, 0, 1.0],
        initial_pos = [0.0, -10, 10])
    c5.set_transition(c4, 20, "square")

    self.cameras = [c1, c2, c3, c4, c5]
""".format(cadModelName, framesOutDir)

# Set animation times
animation = smp.GetAnimationScene()
animation.Cues.append(anim_cue)
animation.PlayMode = 'Snap To TimeSteps'
timesteps = animation.TimeKeeper.TimestepValues
nFrames = len(timesteps)
animation.StartTime = timesteps[max(0, animation_start_time)]
animation.EndTime = timesteps[min(nFrames-1, animation_end_time)]
Play the animation
# Play the animation
animation.Play()
Using LidarView GUI
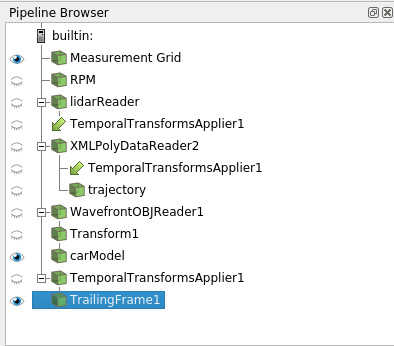
Define your pipeline in the Pipeline Browser pane.
Example:
Open the Animation pane, choose the Snap to timesteps mode

Double-click on the Python button in the animation table if it has automatically been added (normal behavior) or add a Python animation by selecting it in the drop-down list under the table and clicking on +.
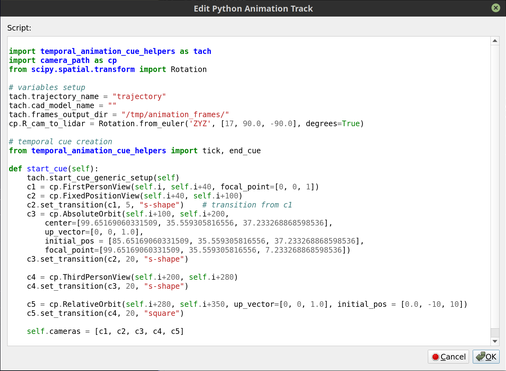
This will open a pop-up window. Replace its content by the animation script.
Example:
Press OK and run the animation with the Play button in the top bar.
This will save a screenshot at each timestep of the data into the folder that is defined as tach.frames_output_dir.
Update Q1 2025: The examples above may not be up to date. If you are interested in this topic, we advise you to check the following guidelines : https://gitlab.kitware.com/LidarView/lidarview-core/-/blob/master/Examples/Python/UsePythonAnimations.md