HyperTreeGrid in VTK: Data Construction

This is the second part of a series of blog articles about vtkHyperTreeGrid usage and implementation in VTK. The first part, an introduction about HTG, can be found here, the third part, HTG: Using Masks, can be found here, the fourth part, HTG: Specific Filters, can be found here, the fifth part, HTG: Cursors and Supercursors, can be found here.
After quickly focusing on the TB-AMR (tree-based Adaptive Mesh Refinement) technique, we are now exploring the construction of a HyperTreeGrid (the TB-AMR representation in VTK).
Let’s illustrate the construction of such a representation by following an example written in Python:

First step : Declare and construct the rectilinear grid
The definition of a vtkHyperTreeGrid in Python is done as follows:
import vtk
htg = vtk.vtkHyperTreeGrid()
We continue with the description of the global rectilinear grid:
htg.SetDimensions([4,3,1])Then the coordinates of the points along each axis (here, TB-AMR 2D), starting with:
htg.SetXCoordinates(xValues)Where xValues is a vtkDoubleArray of 4 values. Respectively, this work needs to be done along Y (3 values) by SetYCoordinates and Z (one value) by SetZCoordinates.
The branch factor still needs to be defined at the global level by the following call:
htg.SetBranchFactor(2)Second step : Declare and set a cursor on a cell of the rectilinear grid
One of the construction methods is to go only through each root cell of this grid once in order to describe the refined tree of this cell, if necessary.
To do so, we create:
- A non-oriented cursor. Non-oriented because we want to be able to move from a cell to a child cell:
ToChild(iChild), or to the parent cell:ToParent() - The global offset of the root cell tree being processed.
cursor = htg.vtkHyperTreeGridNonOrientedCursor()
globalOffset = 0
To identify a root cell in the grid by a global index tree, we can use the method:
htg.GetIndexFromLevelZeroCoordinates(global_index_tree, index_tree_i, index_tree_j, index_tree_k)With index_tree_i (resp. j and k) starting at 0 as in C language.
We then need to position the cursor following the first cell of this decomposition tree as follows:
htg.InitializeNonOrientedCursor(cursor, global_index_tree, True)The create parameter is set here to True to indicate that we are requesting the creation of a decomposition tree. It does not need to be specified (False by default) when creating a cursor to explore this same tree.
Still in the case of creation, we must give the global offset of the root cell tree.
cursor.SetGlobalIndexStart(globalOffset)The cursor then points to the root cell tree. Initially, this cell is created and considered as leaf cell, unrefined.
Third step : Use this cursor to build the tree with successive refinements
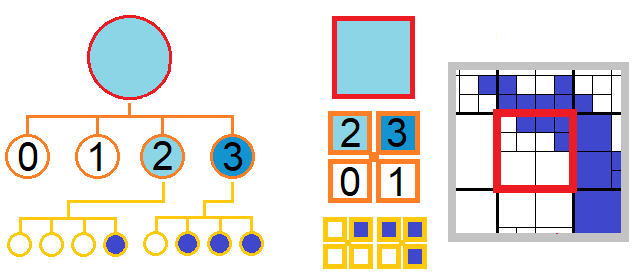
From there, we can decide to subdivide this cell:
cursor.SubdivideLeaf()
describe the decomposition tree of the rectilinear mesh with right results.
The numbers in black indicate the course index of the
daughter stitches, a value ranging from 0 to the branch factor
high at the value of the spatial dimension minus 1.
Then we need to move to one of these daughter cells :
cursor.ToChild(iChild)Where iChild is the index of the child cell, which must be between 0 and b^d, b being the branch factor and d being the number of spatial dimension..
It is also possible to move to the parent cell:
cursor.ToParent()At any time, information is accessible from this cursor:
- The global offset, which identifies the index in an array where the value of the current cell must be stored, or how to access its value,
idx = cursor.GetGlobalNodeIndex()
scalar.InsertTuple1(idx, val)
scalar.GetTuple1(idx, val)- The current level (with level 0 as the root cell tree):
iLevel = cursor.GetLevel()Without having to move the cursor to the root cell tree, you can decide to finish building this refined tree. All you have to do is to go to the next tree that has not yet been defined.
Warning: This construction method does not allow you to complete an already described TB-AMR, as it requires a global index definition which will be covered in the next article.
But first, you must update the global offset of the root cell tree from the construction of the current tree :
globalOffset += cursor.GetTree().GetNumberOfVertices()Fourth step : Move the cursor to another rectilinear grid cell, an unrefined cell.
Before positioning on the next tree to be subdivided down by resetting the cursor:
htg.GetIndexFromLevelZeroCoordinates(new_global_index_tree, new_index_tree_i, new_index_tree_j, new_index_tree_k)
htg.InitializeNonOrientedCursor(cursor, new_global_index_tree, True)
cursor.SetGlobalIndexStart(globalOffset)
Then we continue as in step 3.
Build view: an unstructured representation
To view this representation, you can convert it to an unstructured representation with the following call:
geometry = vtk.vtkHyperTreeGridGeometry()
geometry.SetInputData(htg)
Two remarks:
- The topology of the unstructured mesh produced is not correct but is more than enough to perform the rendering
- In 3D, only the mesh surface is rendered.
Currently, in 2D, this geometry filter can take a camera as a parameter in order to control an adapted building of the unstructured mesh. This filter roughly builds a pixel level or offscreen cells.
As we arrive to the end of this second article, we need to send a warning: The vtkHyperTreeGrid representation is compact; hence a filter application producing another representation as output (unstructured for example) will generate a memory blast. This is why it is preferable to use, or create, specific filters for this representation.
Simple yet complete example
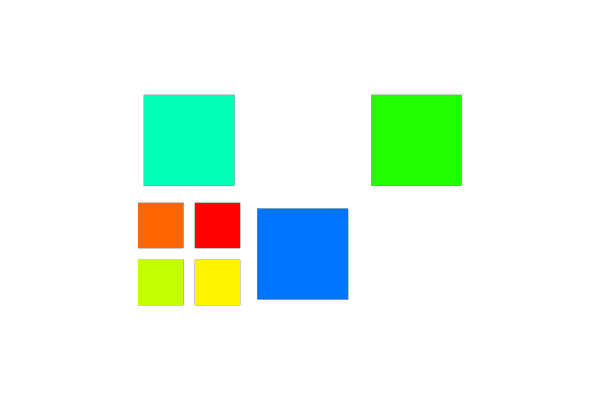
Here is a small complete Python code whose result will give:

#!/usr/bin/env python
import vtk

# Declare htg
htg = vtk.vtkHyperTreeGrid()
htg.Initialize()

# Declare scalar
scalarArray = vtk.vtkDoubleArray()
scalarArray.SetName('MyScalar')
scalarArray.SetNumberOfValues(0)
htg.GetCellData().AddArray(scalarArray)
htg.GetCellData().SetActiveScalars('MyScalar')

# Construct the rectilinear grid
htg.SetDimensions([4, 3, 1])
htg.SetBranchFactor(2)

## X coordinates
xValues = vtk.vtkDoubleArray()
xValues.SetNumberOfValues(4)
xValues.SetValue(0, -1)
xValues.SetValue(1, 0)
xValues.SetValue(2, 1)
xValues.SetValue(3, 2)
htg.SetXCoordinates(xValues)

## Y coordinates
yValues = vtk.vtkDoubleArray()
yValues.SetNumberOfValues(3)
yValues.SetValue(0, -1)
yValues.SetValue(1, 0)
yValues.SetValue(2, 1)
htg.SetYCoordinates(yValues)

## Z coordinates
zValues = vtk.vtkDoubleArray()
zValues.SetNumberOfValues(1)
zValues.SetValue(0, 0)
htg.SetZCoordinates(zValues)

# Declare cursor
cursor = vtk.vtkHyperTreeGridNonOrientedCursor()

# Initialise values offset
offsetIndex = 0

# Set cursor on cell #0 and set the start index
htg.InitializeNonOrientedCursor(cursor, 0, True)
cursor.SetGlobalIndexStart(offsetIndex)  # cell 0

# Assigns an index for the value of the cell pointed to by the current cursor state
idx = cursor.GetGlobalNodeIndex()
scalarArray.InsertTuple1(idx, 1)

# Decides to subdivide cell pointed by current cursor state
cursor.SubdivideLeaf()  # cell 0

# In this example, 4 child cells were constructed
# Move the cursor to the first child
cursor.ToChild(0)  # cell 0/0
idx = cursor.GetGlobalNodeIndex()
scalarArray.InsertTuple1(idx, 7)
cursor.ToParent()  # cell 0

# Move the cursor to the second child
cursor.ToChild(1)  # cell 0/1
idx = cursor.GetGlobalNodeIndex()
scalarArray.InsertTuple1(idx, 8)
cursor.ToParent()  # cell 0

# And next
cursor.ToChild(2)  # cell 0/2
idx = cursor.GetGlobalNodeIndex()
scalarArray.InsertTuple1(idx, 9)
cursor.ToParent()  # cell 0

# And next
cursor.ToChild(3)  # cell 0/3
idx = cursor.GetGlobalNodeIndex()
scalarArray.InsertTuple1(idx, 10)
cursor.ToParent()  # cell 0

# Refine the cell 0
offsetIndex += cursor.GetTree().GetNumberOfVertices()

# Set cursor on cell #3 and set the start index
htg.InitializeNonOrientedCursor(cursor, 1, True)
cursor.SetGlobalIndexStart(offsetIndex) # cell 1
idx = cursor.GetGlobalNodeIndex()
scalarArray.InsertTuple1(idx, 2)

# Refined the cell 1
offsetIndex += cursor.GetTree().GetNumberOfVertices()

# Set cursor on cell #3 and set the start index
htg.InitializeNonOrientedCursor(cursor, 3, True)
cursor.SetGlobalIndexStart(offsetIndex) # cell 3
idx = cursor.GetGlobalNodeIndex()
scalarArray.InsertTuple1(idx, 4)

# Refined the cell 3
offsetIndex += cursor.GetTree().GetNumberOfVertices()

# Set cursor on cell #5 and set the start index
htg.InitializeNonOrientedCursor(cursor, 5, True)
cursor.SetGlobalIndexStart(offsetIndex) # cell 5
idx = cursor.GetGlobalNodeIndex()
scalarArray.InsertTuple1(idx, 6)

# Refined the cell 5
offsetIndex += cursor.GetTree().GetNumberOfVertices()

# Which ends the construction of my mesh
# Use a Geometry filter
geometry = vtk.vtkHyperTreeGridGeometry()
geometry.SetInputData(htg)

# Add, for example, a Shrink filter
shrink = vtk.vtkShrinkFilter()
shrink.SetInputConnection(geometry.GetOutputPort())
shrink.SetShrinkFactor(.8)

# LookupTable
lut = vtk.vtkLookupTable()
lut.SetHueRange(0.66, 0)
lut.UsingLogScale()
lut.Build()

# Mappers
mapper = vtk.vtkDataSetMapper()
mapper.SetInputConnection(shrink.GetOutputPort())
mapper.SetLookupTable(lut)
mapper.SetColorModeToMapScalars()
mapper.SetScalarModeToUseCellFieldData()
mapper.SelectColorArray('MyScalar')

# Actors
actor = vtk.vtkActor()
actor.SetMapper(mapper)

# Renderer
renderer = vtk.vtkRenderer()
renderer.SetActiveCamera(camera)
renderer.AddActor(actor)

# Render window
renWin = vtk.vtkRenderWindow()
renWin.AddRenderer(renderer)
renWin.SetSize(600, 400)

# Render window interactor
iren = vtk.vtkRenderWindowInteractor()
iren.SetRenderWindow(renWin)

# render the image
renWin.Render()
iren.Start()
Compatible with VTK 9.0.1 and ParaView 5.9.1
A complete example in Python was made by Sébastien Jourdain during a “Hackathon” in January 2019.
Acknowledgements
This work was supported by CEA
CEA, DAM, DIF, F-91297 Arpajon, France
